TL;DR:
- A dripping backflow preventer is typically repairable by replacing worn rubber seals or cleaning debris, avoiding unnecessary replacements. Proper depressurization, correct parts, and annual certified testing are essential for effective maintenance and compliance in New Jersey. Regular inspections and timely repairs help prevent costly failures and ensure safe water supply management.
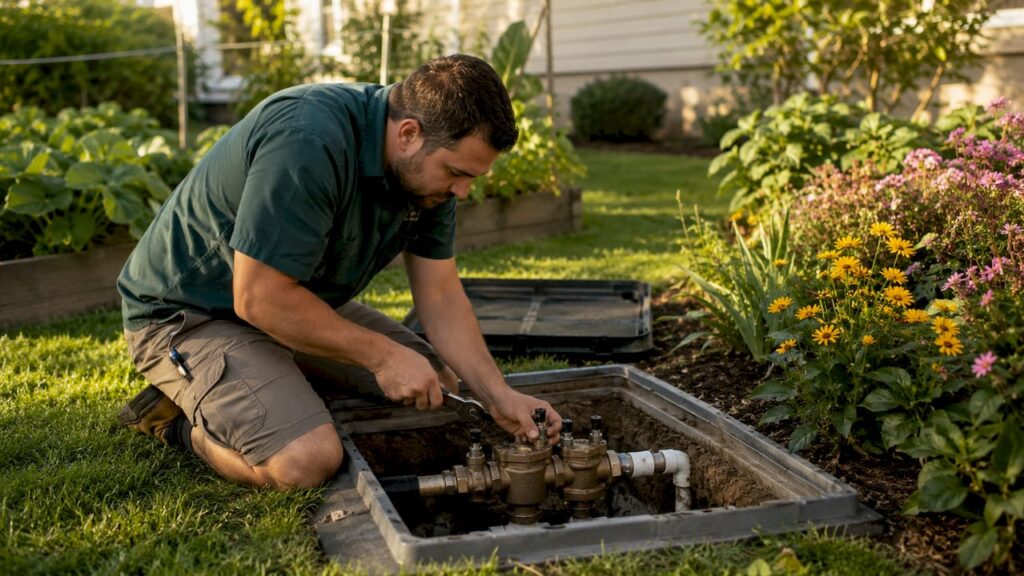
A dripping backflow preventer is a repairable plumbing failure in most cases, not a reason to replace the entire assembly. The industry term is “backflow preventer,” though many property owners search for a backflow device dripping fix when they spot water pooling beneath the unit. Worn rubber washers cause 90% of backflow leaks and can be replaced in 10–30 minutes for $2–$5 in parts. Knowing the exact cause before you pick up a wrench saves time, money, and the risk of making a small drip into a bigger problem. This guide covers diagnosis, repair steps, and New Jersey compliance requirements in full.
What causes a backflow device to drip?
Most dripping backflow preventers share a short list of root causes. Identifying the right one before you start repairs is the fastest path to a lasting fix.
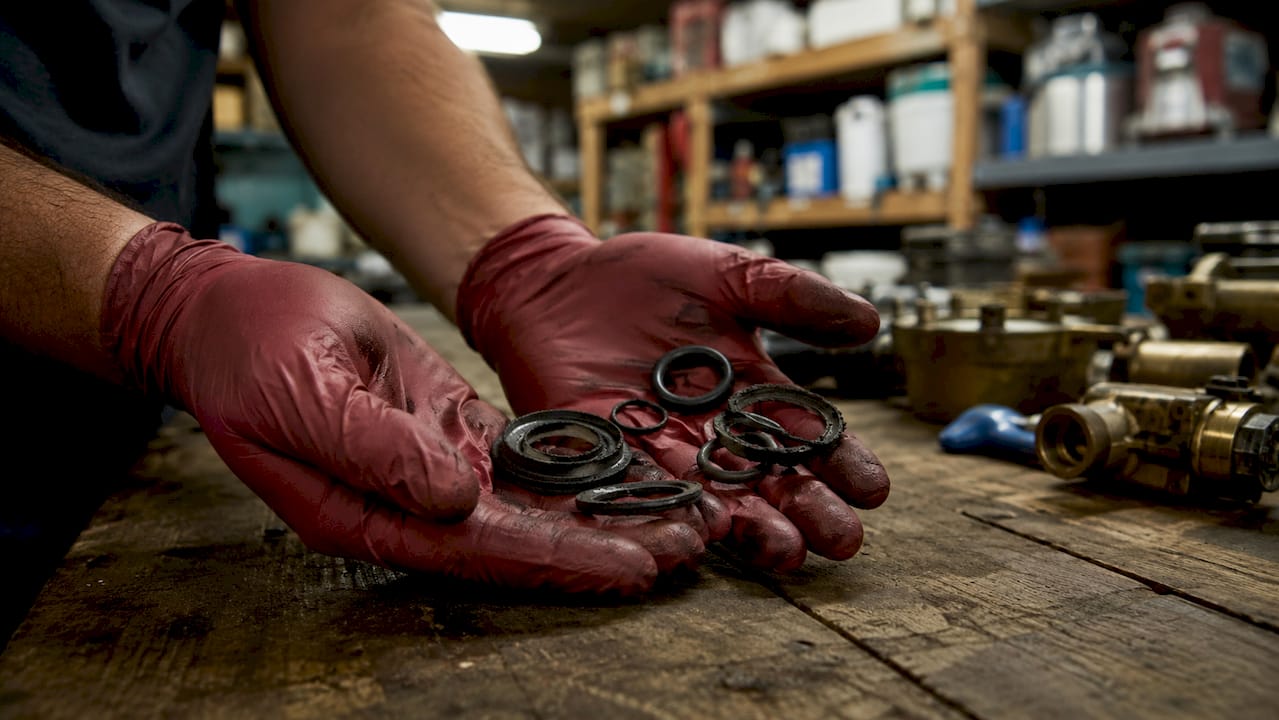
Worn rubber washers and O-rings are the leading culprit. These small seals compress thousands of times over their service life and eventually lose their ability to hold a watertight seal. Replacement costs less than a cup of coffee and takes under half an hour.
Debris in the spring assembly is the second most common cause, accounting for roughly 5% of leaks. Sediment, mineral flakes, and pipe scale lodge between the check valve disc and its seat. Even a thin layer of grit prevents a full seal and produces a steady drip.
Here are the most common causes you will encounter:
- Worn rubber washers or O-rings: Seals harden and crack with age, especially in New Jersey’s freeze-thaw climate.
- Debris on check valve seats: Sand, pipe scale, or mineral deposits prevent valves from closing fully.
- Improper installation height: Pressure Vacuum Breakers must sit at least 12 inches above the highest downstream outlet. A device installed too low drips regardless of seal condition.
- Over-tightening during a previous repair: Crushing a rubber washer by over-torquing a fitting causes it to fail faster than normal wear.
- Failed internal check valves: When both check valves in a Reduced Pressure Zone (RPZ) device fail, the relief valve discharges continuously. An RPZ relief valve that drips during normal operation signals internal failure and requires a certified tester.
- Water hammer: A sudden pressure spike from a downstream valve closing fast can trigger the relief valve to vent. This pressure-surge dripping is a hydraulic system issue, not a device failure.
Pro Tip: Run your irrigation or downstream fixtures and watch the device closely. A drip that stops when water flow stops is likely normal venting. A drip that continues with the system off is a seal or valve failure that needs repair.
One distinction matters before you start any repair: intermittent dripping from atmospheric vacuum breakers during active water flow is normal. Continuous dripping when the system is off is not. Getting this wrong leads to unnecessary part replacements or, worse, ignoring a real failure.
Tools and materials needed for the repair
Gathering the right supplies before you open the device saves a second trip to the hardware store and keeps the repair moving safely.
| Item | Purpose | Notes |
|---|---|---|
| Adjustable wrench or channel-lock pliers | Remove fittings and caps | Use a rag to protect finish |
| Flathead and Phillips screwdrivers | Remove covers and test cock plugs | Standard sizes cover most brands |
| Replacement rubber washers and O-rings | Seal check valves and end caps | Match to your device model number |
| Silicone grease (food-grade or plumbing-grade) | Lubricate new seals during assembly | Never substitute petroleum-based grease |
| Soft-bristle brush or toothbrush | Clean debris from valve seats | Avoid wire brushes on brass seats |
| Bucket and towels | Catch residual water during disassembly | Essential for indoor or basement units |
| Safety glasses | Eye protection from pressurized water | Required before opening any test cock |
The most important material note: petroleum-based lubricants degrade rubber seals and accelerate the exact failure you are trying to fix. Use only manufacturer-approved silicone grease. Brands like Watts, Febco, and Wilkins each publish approved parts lists for their assemblies. Match your replacement washers to the model number stamped on the device body. Buying generic seals that are close in size but not exact leads to premature failure.
For New Jersey properties, purchase parts from a licensed plumbing supply house rather than a big-box retailer when possible. Supply houses stock model-specific rebuild kits that include every seal in the assembly, which is more reliable than sourcing individual O-rings by measurement alone.
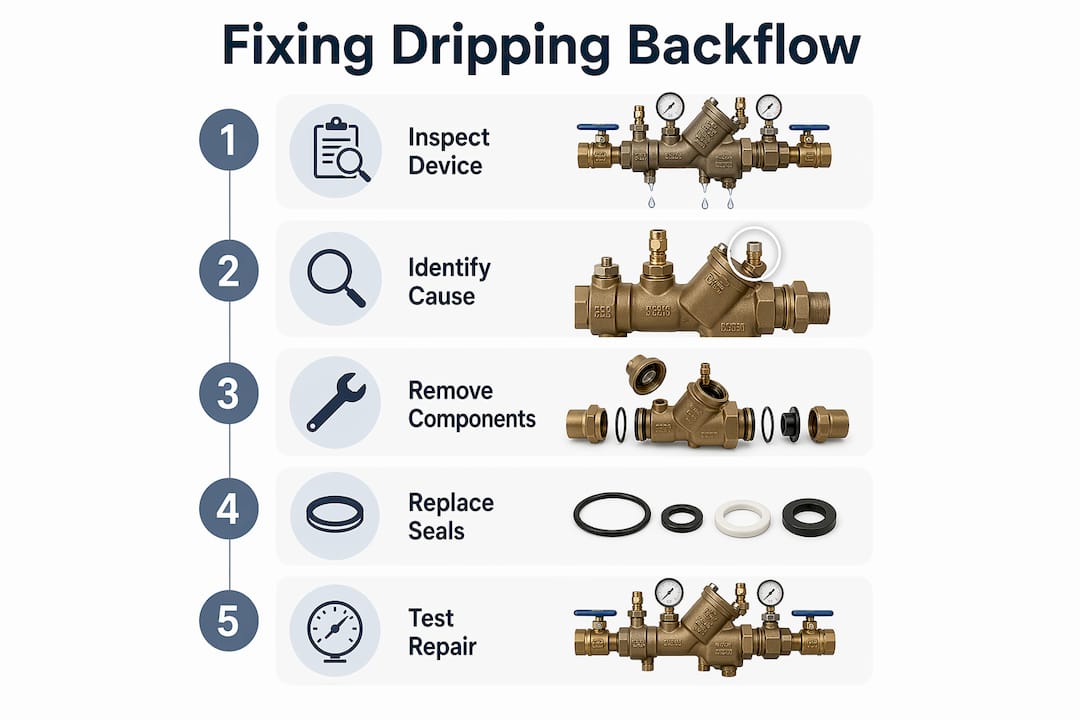
Step-by-step guide to fixing a dripping backflow preventer
Follow these steps in order. Skipping the depressurization step is the most dangerous mistake in any backflow device repair.
-
Shut off the upstream isolation valve. Turn the handle on the inlet shutoff to the closed position. This is the valve on the supply side of the backflow preventer, closest to the water meter.
-
Close the downstream isolation valve. Closing both valves isolates the device from the rest of the system and prevents water from flowing back through during disassembly.
-
Depressurize the device fully. Open all test cocks on the device body using a flathead screwdriver. Failing to fully depressurize before disassembly risks a sudden water release that can cause injury. Let water drain into your bucket until flow stops completely.
-
Remove the check valve covers or end caps. Use your wrench to unscrew the access caps. Keep track of the order and orientation of every component as you remove it. A phone photo of the assembly before disassembly is worth taking.
-
Inspect and clean the valve seats. Look for debris, mineral scale, or corrosion on the rubber disc and its brass seat. Use your soft-bristle brush and clean water to remove any buildup. Do not use abrasive pads on brass seats.
-
Replace worn washers and O-rings. Remove the old seals and compare them to your replacement parts. Apply a thin coat of silicone grease to each new seal before installation. Seat each washer flat and even with no folds or gaps.
-
Reassemble in reverse order. Hand-tighten all caps first, then snug them with your wrench. Do not over-torque. A firm quarter-turn past hand-tight is sufficient for most residential devices.
-
Restore water pressure slowly. Open the upstream isolation valve slowly, about a quarter-turn at a time. Watch the device body and all fittings for drips as pressure builds.
-
Test for leaks. Once full pressure is restored, observe the device for five minutes. Check the relief valve port, end caps, and test cock plugs. A dry device after five minutes indicates a successful repair.
Pro Tip: If you see water weeping from the device body itself rather than a fitting or port, stop immediately. A cracked or corroded body cannot be fixed with new seals.
Device bodies with visible cracks or corrosion require full replacement under USC FCCCHR and ASSE standards. Component repairs on a structurally compromised body do not meet New Jersey plumbing code.
Troubleshooting persistent leaks and common mistakes
Some drips return within days of a repair. That pattern points to a cause the initial fix did not address.
- Leak returns at the same fitting: The washer seat may be pitted or corroded. A new washer on a damaged seat will not seal. The check valve module needs replacement, not just the washer.
- Relief valve keeps discharging: This is the most misread symptom in backflow prevention troubleshooting. Repeated relief valve discharge signals upstream hydraulic problems or a failed first check valve, not a loose fitting.
- Drip appears only during irrigation cycles: Check your installation height. PVB devices installed below the 12-inch minimum above the highest outlet will drip under normal operating pressure regardless of seal condition.
- Device leaks after freeze-thaw season: New Jersey winters are hard on outdoor assemblies. Mineral buildup and micro-cracks from freeze cycles often appear as leaks in spring. Mineral buildup and corrosion contribute to premature failure even when no visible damage is present.
“Improper installation and unlicensed tampering risk public health, liability, and legal penalties. The backflow preventer is a critical life-safety device requiring code adherence.” — Backflow Prevention Issues in Commercial and Residential Settings in 2026
New Jersey municipalities require annual testing by a licensed Backflow Prevention Assembly Tester (BPAT) for certification. A DIY seal replacement does not substitute for that annual test. If your device has not been tested this year, schedule that service regardless of whether your repair appears successful. Skipping it can result in municipal notices and fines. You can review your legal obligations in detail through the backflow preventer FAQs published by Southjerseybackflow.
Key Takeaways
A dripping backflow preventer is almost always caused by worn rubber seals or debris, and fixing it requires proper depressurization, correct parts, and annual certified testing to stay compliant in New Jersey.
| Point | Details |
|---|---|
| Worn seals are the top cause | Replace rubber washers and O-rings first; they cause 90% of all backflow leaks. |
| Depressurize before opening | Open all test cocks and drain fully before disassembly to prevent injury. |
| Use silicone grease only | Petroleum-based lubricants degrade seals and accelerate future failures. |
| Check installation height | PVB devices must sit at least 12 inches above the highest outlet or they will drip regardless of seal condition. |
| Annual testing is required by law | New Jersey mandates licensed BPAT testing yearly; a DIY repair does not replace this obligation. |
What years of New Jersey backflow work have taught me
Most property owners I talk to assume a dripping backflow preventer means the whole unit is shot. That assumption costs them hundreds of dollars in unnecessary replacements. The reality is that the number one cause of premature device failure is skipping annual testing, not the drip itself. The drip is usually a $3 washer. The failure that follows from ignoring annual inspections is a $400 replacement.
New Jersey’s water supply varies significantly by county. Properties in areas with older iron mains see more sediment-related failures. Coastal properties deal with mineral-heavy water that accelerates corrosion inside the device body. I always recommend that property owners in these areas inspect their devices every spring, not just when a drip appears. Catching mineral scale before it scores a valve seat is far cheaper than replacing the check valve module.
One mistake I see repeatedly: someone replaces the washers correctly but uses a petroleum-based lubricant from the garage because it was handy. The new seals fail within a season. Silicone grease is not optional. It is the difference between a repair that lasts three years and one that lasts three months.
Balance DIY repairs with professional evaluations. You can handle washer replacements and debris cleaning confidently. But if the device is more than ten years old, has visible corrosion, or keeps failing after repairs, a licensed tester needs to evaluate it. That evaluation also satisfies your annual certification requirement, so it is never wasted money.
— Jordan
How Southjerseybackflow can help you stay compliant
Southjerseybackflow provides licensed backflow testing, certification, and repair services across New Jersey, including Ocean County, Mercer County, Salem County, and Middlesex County. If your DIY repair resolved the drip but your annual test is overdue, our licensed BPAT technicians handle the full certification process and submit results directly to your municipality.

For properties with persistent leaks, structural damage, or devices that have never been professionally evaluated, our team diagnoses the root cause and performs code-compliant repairs or replacements. Read the full walkthrough on passing your NJ backflow test to understand exactly what the certification process involves and what inspectors check. Schedule your service through Southjerseybackflow and stay ahead of municipal compliance deadlines.
FAQ
What is the most common cause of a dripping backflow preventer?
Worn rubber washers and O-rings cause roughly 90% of backflow preventer leaks. Replacing them costs $2–$5 in parts and takes under 30 minutes in most cases.
Is a dripping backflow device dangerous?
Continuous dripping when the system is off signals a seal or valve failure that can allow contaminated water to enter the supply line. Address it promptly to protect water quality and avoid municipal violations.
Can I fix a dripping backflow preventer myself in New Jersey?
You can replace washers, clean debris, and reassemble the device yourself. However, New Jersey still requires annual testing by a licensed BPAT for certification, which a DIY repair does not replace.
When should I call a professional instead of doing it myself?
Call a licensed technician if the device body is cracked or corroded, if the RPZ relief valve discharges continuously, or if the drip returns after a seal replacement. These conditions require certified inspection and may require full device replacement.
How often should a backflow preventer be tested in New Jersey?
New Jersey municipalities require annual testing by a certified Backflow Prevention Assembly Tester. Review your common backflow issues and local requirements to stay on schedule.